

Solution 1: Check Google Chrome Task Manager
Check the inbuilt Google Chrome task manager to see which extension or activity is using how much CPU in Chrome and fix Google chrome CPU usage high Windows 10.
Follow the steps given:
- From the Desktop > open Google Chrome
- And open Setting by clicking the three dots > select More tools > under it, click Task Manager from the list.

- In Google Chrome Task Manager, check the extensions, Tabs, and processes and also their CPU, memory usage, Network activities, and Processor ID.

From here check the Tabs or extensions using or exhibiting too much CPU. Also, check the problematic activities that cause your PC to slow down or crash. and try to fix them or else try the given solutions.
Solution 2: Clear Chrome Cache and Cookies
Clear the Google Chrome cache and cookies, as some of the old cache files and cookies can cause the chrome high CPU usage problem in Windows 10
So follow the steps to clear cache and cookies in Chrome:
- At the top right corner in Chrome > click three dots > click More tools > Clear browsing data.

- Now from the Basic tab > set the Time range to All-time > and select all the checkboxes

- Then from Advanced tab,> set the Time range to All-time > and choose the types of information you want to remove (For ex.: Cookies and other site data, Cache images and files)

- Click Clear data.
- As the data is cleared > type chrome://restart in the URL bar > hit Enter to restart Chrome.

Now check if the fix Chrome high CPU usage problem is resolved or not.
Solution 3: Disable Unnecessary Chrome Extensions
This is a working solution that helped many users to fix the Chrome high CPU usage or 100% CPU, memory or disk usage problem in Windows 10.
If you have installed plenty of Chrome extensions then these are the main culprit for Google Chrome 100% CPU usage. So, here it is suggested to disable or delete them one by one and after that restart Google Chrome.
Follow the steps to do so:
- In the URL bar type chrome://extensions > hit Enter to open the Chrome extension manager, where the extensions are installed.

- And toggle off all extensions to disable them.

- Restart Chrome
Hope this works for you to fix the Google Chrome high CPU usage Windows 10 issues, if not then move ahead to another solution.
Solution 4: Reset Chrome Settings to Default
Resetting Google Chrome to the default settings is another helpful solution to fix Chrome high CPU usage problem.
Follow the steps to do so:
- In Chrome click the top right corner three dots > go to Settings.

- Then at the bottom > click Advanced.

- Next under Reset and cleanup > click Reset settings to their original defaults > Reset Settings.

- Restart Chrome.
Solution 5: Remove Google Chrome Hardware Acceleration
To fasten the browsing speed, Google Chrome allows users to make use of the hardware acceleration on Windows 10. And this is what leading the high CPU in Google Chrome for many users.
So, it is recommended to disable the Google Chrome Hardware Acceleration:
- In Google Chrome > go to Settings > and click on Advanced.

- And below Advanced settings > locate System > uncheck the option Use hardware acceleration when available.
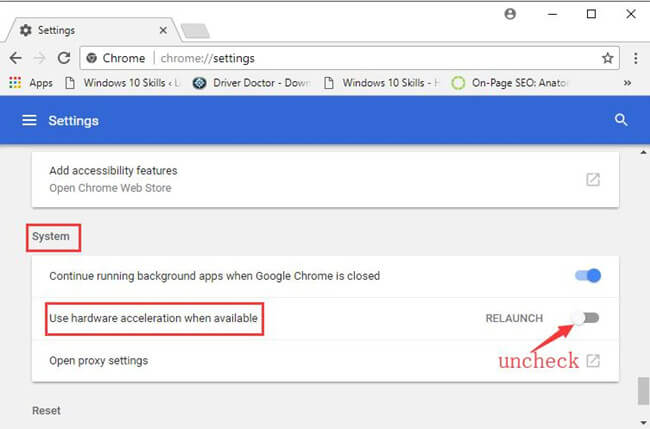
Hope after disabling the hardware acceleration, the Google Chrome high CPU usage Windows 10 is resolved.
Solution 6: Reinstall Chrome
If none of the above-given solutions worked for you then try reinstalling Chrome.
- Go to Control Panel > and delete the folder to completely remove Chrome:
C:\Users\<username>\AppData\Local\Google\Chrome\

- And download the latest version of Chrome from its official website.
No comments:
Post a Comment