
Disable programs that run on startup

Start by launching the Task Manager: Press Ctrl-Shift-Esc, right-click the lower-right corner of your screen and select Task Manager, or type task manager into the Windows 10 search box and press Enter. If the Task Manager launches as a compact app with no tabs, click “More details” at the bottom of your screen. The Task Manager will then appear in all of its full-tabbed glory. There's plenty you can do with it, but we're going to focus only on killing unnecessary programs that run at startup.
Click the Startup tab. You'll see a list of the programs and services that launch when you start Windows. Included on the list is each program's name as well as its publisher, whether it's enabled to run on startup, and its “Startup impact,” which is how much it slows down Windows 10 when the system starts up.
To stop a program or service from launching at startup, right-click it and select “Disable.” This doesn't disable the program entirely; it only prevents it from launching at startup — you can always run the application after launch. Also, if you later decide you want it to launch at startup, you can just return to this area of the Task Manager, right-click the application and select “Enable.”
Clean out your hard disk
Windows 10 has a surprisingly useful built-in tool for doing this called Storage Sense. Go to Settings > System > Storage and at the top of the screen, move the toggle from Off to On. When you do this, Windows constantly monitors your PC and deletes old junk files you no longer need — temporary files, files in the Downloads folder that haven’t been changed in a month, and old Recycle Bin files.
You can customize how Storage Sense works and also use it to free up even more space than it normally would. Underneath Storage Sense, click “Configure Storage Sense or run it now.” From the screen that appears, you can change how often Storage Sense deletes files (every day, every week, every month or when your storage space gets low).
You can also tell Storage Sense to delete files in your Download folder, depending on how long they’ve been there, and set how long to wait to delete files in the Recycle Bin automatically.
Clean out your Registry
Before using Auslogics or any other Registry Cleaner, you should back up your Registry so you can restore it if anything goes wrong. (Auslogics Registry Cleaner does this for you as well, but it can’t hurt to have it backed up twice.) To do your own Registry backup, type regedit.ext in the search box, then press Enter. That runs the Registry editor. From the File menu, select Export. From the screen that appears, make sure to choose the “All” option in the Export range section at the bottom of the screen. Then choose a file location and file name and click Save. To restore the Registry, open the Registry editor, select Import from the File menu, then open the file you saved.
Now download, install and run Auslogics Registry Cleaner. On the left-hand side of the screen you can select the kinds of Registry issues you want to clean up — for example, File Associations, Internet or Fonts. I generally select them all.
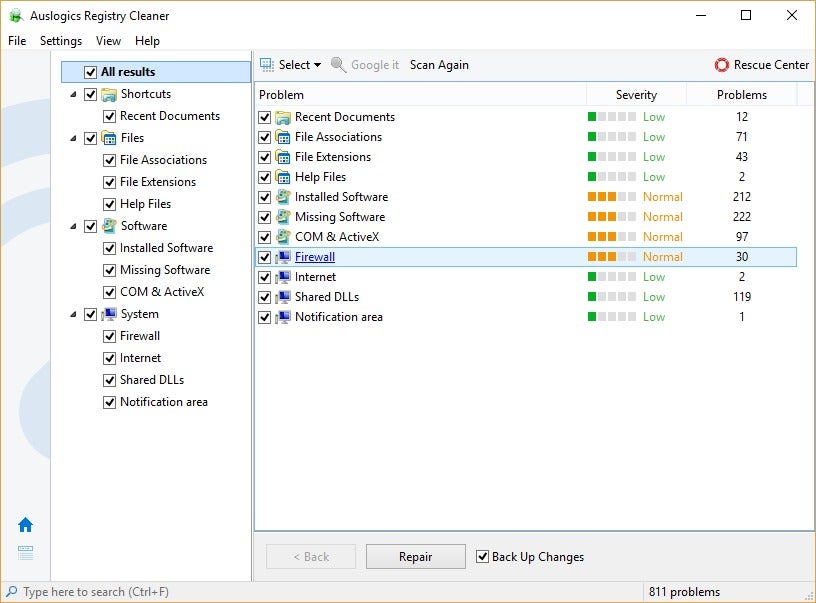
Next, tell it to scan the Registry for problems. To do that, click “Scan Now,” and from the drop-down menu that appears, select Scan. That lets you first examine the Registry problems it finds. If you instead choose “Scan and Repair,” it makes the fixes without you checking them.
It now scans your Registry for errors, then shows you what it found. It ranks the errors according to their severity to help you decide which to fix. Click Repair when you’ve made your decision, and make sure that “Back Up Changes” is checked, so you can restore the Registry easily if something goes wrong.
Use ReadyBoost to speed up disk caching
Windows 10 regularly stores cached data on your hard disk, and then when it needs the data, fetches it from there. The time it takes to fetch cached data depends on the speed of your hard disk. If you have a traditional hard disk instead of an SSD, there’s a trick that can help speed up your cache: use Windows’ ReadyBoost feature. It tells Windows to cache data to a USB flash drive, which is faster than a hard disk. Fetching data from that speedier cache should speed up Windows.
First, plug a USB flash drive into one of your PC’s USB ports. The flash drive needs to support at least USB 2.0, and preferably USB 3 or faster. The faster your flash drive, the more of a speed boost you should see. Also, look for a flash drive that is at least double the size of your PC’s RAM for maximum performance.
After you plug in in the drive, open File Explorer and click “This PC.” Look for the flash drive. It may have an odd name, like UDISK 28X, or something even less-obvious. Right-click it, choose Properties and click the ReadyBoost tab.
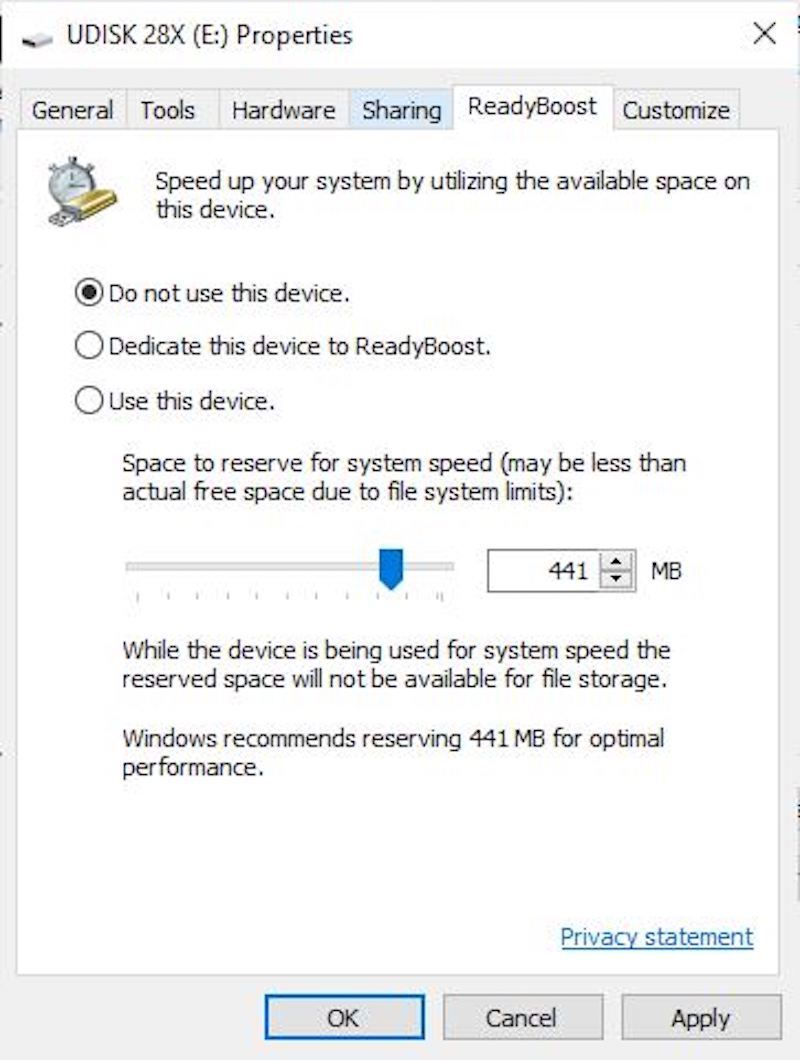
You’ll come to a screen that asks whether you want to use the flash drive as a cache and recommends a cache size. Leave the cache size as is or change it if you like. Then select “Dedicate this device to ReadyBoost” and click Apply and then click OK.
(Note that if you see the message, “This device cannot be used for ReadyBoost” when you click the ReadyBoost tab it means your flash drive doesn’t meet ReadyBoost’s minimum performance standards, so you’ll have to insert a new one.)
As you use your computer, ReadyBoost will start filling the cache with files, so you may notice an increase in disk activity. Depending on how much you use your PC, it can take a few days for your cache to fill and offer maximum improved performance. If you don’t see an increase in performance, try a flash disk with more capacity.
No comments:
Post a Comment