
If you have gone through the First Part and Second Part of "Become PowerPoint Pro" Then You're probably looking for the Third Part-- Therefore I welcome you to the Last Part!

35. Place a Video as a Background for Your Slides
Yes, you have read it right! Apart from images, you can set videos as a background for your slides. All you need to do is drag and drop a video on your slide and adjust its size to fit as a background. If the video is short, then you can just go to its Video Tools > Playback and put it on loop.
36. Embed Fonts in PowerPoint
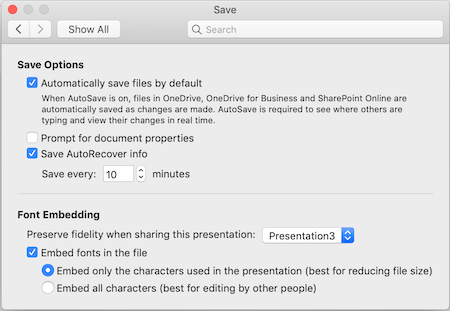
If you work in an organization or for a client who has their own fonts, then this PowerPoint tip will come handy to you. Ideally, the application lets you embed fonts so that the presentation won’t be affected even when it runs on another system. To access this feature, you can go to File > Options > Save > Preserve Fidelity when sharing this presentation. Make sure that the option for “Embed fonts in the file” is enabled here. This will further give you an option to embed specific or all characters in the file.
37. Use the B and W Keys while Presenting
This is one of those PowerPoint tricks that would help you present detailed presentations easily. If you want your audience to focus on you rather than the slide, then just press the “B” key (during slideshow). This will black out the screen and your slide won’t be visible. To get it back, just press any other key or use your mouse pointer. Similarly, you can press the “W” key to white-out the entire screen.
38. Try the Morph Transition
If you want to have a true seamless transition between your slides, then you should try the Morph transition feature. Though, you should know that the transition is only available for Office 365 subscribers as of now. To implement it, you need to make sure that both the slides should have at least one common object. The object can be a text box, shape, Word Art, picture, and so on (does not support Charts).
You can just go to the Transitions tab and select “Morph” from here. Later, you can go to Transitions > Effect Options to implement the selected effects on the objects.
39. Draw Using PowerPoint
It might sound surprising, but PowerPoint is equipped with a native feature that you can use to draw all kinds of figures. To access it, just go to the Review tab and click on “Start Inking”. Office 365 users can find the “Draw” option listed here instead. This will give you an option to switch between different kinds of pens, highlights, colors, and much more. You can use any slide as a canvas and can later export the slide as an image (JPEG) to use it with other applications.
40. Customize Your PowerPoint Experience
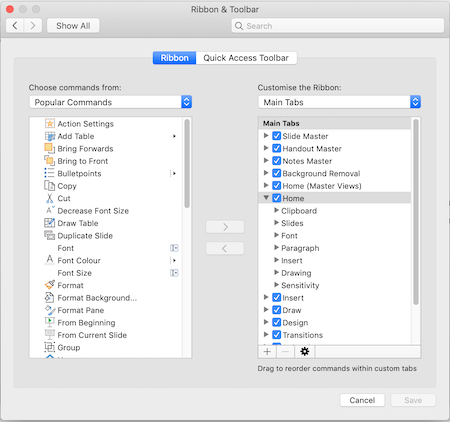
Not every PowerPoint feature can be accessed from the main toolbar. Sometimes, we need to dig a little deeper. If you want, you can go to the PowerPoint Tab>Preferences> Ribbon & Toolbar to further explore these features. Apart from that, you can also customize the interface from here. Just select the options that you wish to access from the toolbar and get rid of any unimportant feature.
41. Switch the Default Language
As of now, Microsoft PowerPoint supports 100+ languages that you can switch from on its interface. Just go to Tools > Language for this. Though, your system should have the required fonts to support some of these languages. In this way, you can work on an impressive presentation in the language of your choice.
42. Insert Any Other Object
From Bitmaps to Excel sheets and Word documents to PDFs – there are so many other things that you can add to your slides. To get this option, just click on Insert > Object and select the file you wish to add. You can create a new file or browse an existing document. This will embed the file to your slide without actually pasting its content.
43. Capture Screenshots On the Go
This is one of the most resourceful features that I often use even beyond drafting presentations. You can take screenshots of different screens and clip them. Just go to the Insert tab on the toolbar and click on the “Screenshot” option. Here, you can see thumbnails of the available screens. Subsequently, you can also clip a part of the screen with the “Screen Clipping” feature here.
44. Create New Autocorrect Options and Shortcuts
If you are tired of manually correcting certain words, formulae, special symbols, etc., then you should certainly check the Autocorrect Options. This will let you manually create new rules and shortcuts for the Autocorrect feature. To access this, just go to PowerPoint Options > Autocorrect Options. Here, you can enter the desired characters, symbols, words, and even phrases, and what they would be replaced with.
45. Customize the Undo Option
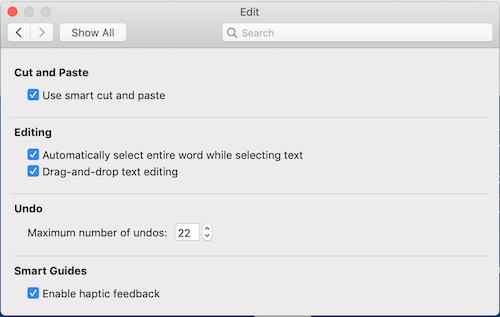
Undo is the inbuilt feature in all the MS Office applications that lets you revoke/retrace an action. By default, most of the applications support undo a maximum of 20 actions that you can easily change. Just go to PowerPoint Options from the File and visit the “Advanced” section. In the latest version, you can find the option at PowerPoint -> Preferences -> Edit. Here, you can manually change how many times users are allowed to “undo” an action.
46. Use Stock Assets
A lot of people make the common mistake of using the same inbuilt graphics, background pictures, clip art, videos, etc., that are already available in PowerPoint. While they might be easily accessible, chances are that your audience could be used to seeing them. To impress them, you can take the assistance of dedicated stock photos, vectors, fonts, and tons of media content. There are several free stock websites that you can check to include impressive visual content in your slideshow.
47. Compress Photos in PowerPoint
Do you have a lot of photos that you need to send? Don’t worry, you don’t have to use any image compression tool for this. Just launch PowerPoint and add the images that you wish to compress. Afterward, just go to File -> “Compress Pictures” option on the toolbar and explore its settings. You can remove corrupted areas of the pictures and set a custom target for the pictures to compress.
48. Save Your Slideshows as Read-only
A lot of times, you wish to share a read-only copy of a presentation. With this trick, you can do the same pretty easily. Choose the “Save As” feature instead of “Save” to get different options to export your file. You can save it as a PDF or XPS file from here or export it as a PowerPoint Show (.PPSX) document. You can even save your document as pictures in JPEG, PNG, or TIFF formats.
49. Secure Your File
If you have any sensitive content on your slideshow, then you need to take some extra measures to protect it. Thankfully, PowerPoint allows you to encrypt the file with a password. Go to File > Password and set the password. The other users can only access the file after verifying its password.
50. Use Add-ins
While PowerPoint has tons of features to offer, sometimes users need to have more control on their documents. In this case, you can explore the “Add-ins” feature. Just go to the PowerPoint Options (or the Insert) tab to enable add-ins. You can also visit the Office Store to explore all kinds of third-party add-ins. Just be sure that you install an add-in from a trusted developer to your application, else it might corrupt your files.
BE SURE TO CHECK THE FIRST PART: Become PowerPoint Pro #1
BE SURE TO CHECK THE SECOND PART: Become PowerPoint Pro #2
No comments:
Post a Comment