
If you have gone through the First Part of "Become PowerPoint Pro" Then You're probably looking for the second Part-- Therefore I welcome you to the Second Part!

18. Generate Random “Lorem ipsum” Text
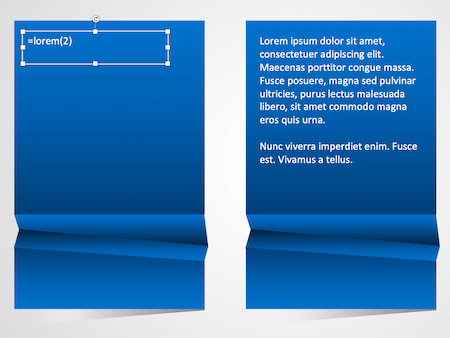
Lorem Ipsum is a universal placeholder for text that is used in graphics, website designing, and other places. If you also wish to show the placement of the text in your slideshow, then you can use this inbuilt feature. Simply insert any text box or shape to your slide and type “=lorem(x)” (without the quotes). Here, “x” would be replaced by the number of paragraphs you want. For instance, to enter 2 paragraphs, just type =lorem(2) and press enter.
19. Prefer Working with a Master Slide
Most of the experts already know the importance related to a master slide. Consider this as a root slide in your document. Any change that you would make on your master slide would automatically be reflected on the other slides. Therefore, you don’t have to make minor changes on each slide individually. Just access the Master Slide from View Option -> Slide Master and explore its features to save your time in editing.
20. Customize the Slide Size and Orientation
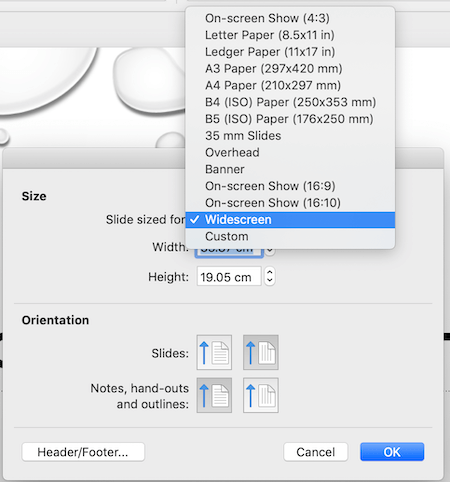
A lot of times, we end up drafting presentations in the wrong orientation or size when we have a restricted screen to work on. Apart from that, if you wish to take a print of your slideshow, then you should also consider this feature. Just go to the “Slide Size” feature under the Design tab. This will let you change the orientation of the slides and even set customized height and width for each slide. In this way, you can set a customized size for your slideshow.
21. Make the Most of Graphs and Charts
Want to include graphs, charts, and other related illustrations in your slideshows? Just go to Insert > Charts and select the diagram that you wish to add. This will also launch an Excel sheet for you to enter your data. The chart would be drawn based on the information you have entered in the Excel sheet.
22. Have a Uniform Text Alignment
Our text is often the most neglected part in presentations. A lot of times, I see people having too much text or when it is cluttered all over. To avoid this, you can follow a uniform alignment in the entire slideshow. For instance, if you have aligned bullets or paragraphs on the left, then follow the same alignment throughout. You can access different kinds of options under the Format toolbar. Apart from the usual left, right, and center, you can also align your text in justified or distributed way. If you have a lot of text placed, then you can divide it into uniform paragraphs too.
23. Consistency is the Key
This is one of the most basic yet useful tip that you should always follow. Make sure that your entire slideshow should follow the same formatting. For example, use the same fonts for title or sub-title in the entire set, have identical bullets, color themes, and so on. If you want, you can pick an inbuilt PowerPoint theme to have a consistent design.
24. Customize the Available Themes
You might already know that PowerPoint offers different themes to save time in editing. Though, a lot of people don’t know that these themes can be further customized by choosing different color options. Just go to the Design tab to explore the available themes on PowerPoint. Afterward, you can just click on the “Colors” option and explore the pre-set color layouts that you can apply on the selected themes.
Apart from that, you can also explore the available fonts and effects that you can implement in the entire theme to maintain consistency.
25. Translate Word or Phrases
You can easily translate any text within PowerPoint. Select the text you want to translate. Go to Review Tab > Translate. Now select the language you wish to translate your current text and it’s done. You can even replace the selected text with translated text by clicking on the Insert Button.
26. Interlink Your Slides with the Action Button
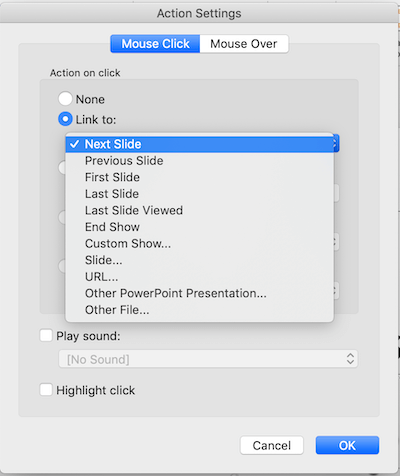
This is one of those PowerPoint design tips that the experts use. A lot of times, we don’t want to follow a linear approach while presenting. You might wish to click on a text or an image to move somewhere else. The best thing about PowerPoint is that it can make any object into an action button.
Just select the object (like a textbox or image) that you wish to link and go to Insert > Action Settings. From here, you can set specific options for a mouse click or mouse hover. You can link it to any other slide in the document or even run any program from here.
27. Create a Slide from an Outline
Most of the people know how to duplicate slides or reuse them. But do you know that you can also create a new slide from an existing outline? Just go to the “New Slide” option and choose to import slides from an outline. This will let you browse a text document (or a Word file) that you can readily use to create a new slide.
28. Use Online Picture/Clip Art (Selectively)
As you know, Microsoft PowerPoint offers a wide range of online pictures (it is called clip art in old versions) that you can include in our documents. Though, most of the time, it is recommended not to use too many vectors in a slide. If you want, you can go to the Insert tab >Pictures -> Online Pictures (Clip Art) and explore the available graphics. Simply select an add-on graphic to the slide and later customize it. Also, you can consider using third-party professional vectors instead of clip arts.
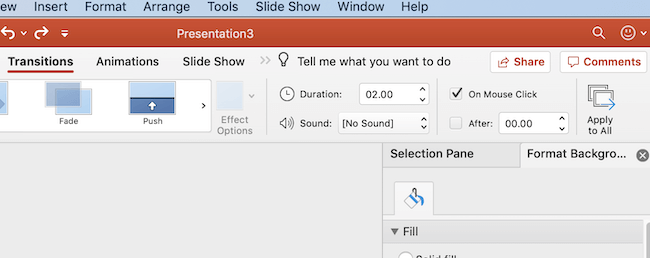
29. Use Transitions Thoughtfully
Microsoft PowerPoint is well-known for the wide range of transitions that it offers. Though, a lot of times, users over-do it, which turns their audience off. Here you must understand that, there is nothing wrong with using no transition at all. If you do, make sure that you stick with a single transition type for the entire slideshow. You can go to the Transitions feature for this and select an appropriate option. Just make sure that you test the transition before giving your final presentation.
30. Use the Automatic Advance Transition Option
If you know there won’t be any interruption in between, then consider using an automatic advance transition option. Under the Transitions tab, you can find the Auto Advance function to set a particular duration for every slide. This could be anything from a second to a few minutes. I would highly recommend practicing your timing in advance several times to ace this feature.
31. Rehearse Your Timing
This PowerPoint trick will help you ace your presentation if you have a limited duration. Under the Slide Show tab, just go to the “Rehearse Timings” feature to explore this. It will let you analyze how much time you spend on a particular slide and the entire presentation. You can also compare it with the auto-advance timing to work on your delivery.
32. Record Your Slideshow
Microsoft PowerPoint also provides a playback option, which lets you record your slideshow. This feature can help you make educational videos and content of all kinds for the web. To access this, just click on the “Record Slide Show” feature under the Slideshow tab. You can also attach your microphone and record your voice with the slideshow.
33. Access Only the Outline
If you are in a rush and don’t want to go through the entire presentation, then just visit the View Tab ->“Outline View”. This will display all the textual content of the document that you can read without any visual aid. If you want, you can just copy this content and paste it in any other document.
34. Embed Audio and Videos
Besides photos, there are numerous other ways to make your slideshows more interesting. If you want, you can add sound and video content to your document. You can go to the Insert tab and select if you wish to insert a sound or a video. This will give you options to browse the available library of Microsoft or go to a location on your system where the media is stored. It will also let you record sound right from PowerPoint that you can later add to your presentation.
BE SURE TO CHECK THE THIRD PART: Become PowerPoint Pro #3
BE SURE TO CHECK THE FIRST PART: Become PowerPoint Pro #1
No comments:
Post a Comment