
Turn On Bluetooth on Your Windows 11 PC
Before you can connect your AirPods to your Windows 11 PC, you’ll need to make sure Bluetooth is turned on, which you can do in the Settings app.
First, click the up arrow in the system tray, and then click the Bluetooth icon from the menu that appears.
![]()
Next, click “Open Settings” near the bottom of the context menu.

You’ll now be on the Bluetooth & Devices page of the Settings app. Toggle the slider next to the Bluetooth option to the “On” position.

Now that Bluetooth is turned on, you can begin pairing your AirPods.
Connect the AirPods to Your Windows 11 PC
To connect your AirPods to your PC, head back to the Bluetooth & Devices page in the Settings app (system tray > Bluetooth icon > Open Settings) and then click “Add Device” next to the option that lets you pair new devices with your PC.

The Add a Device window will appear. Click “Bluetooth” at the top of this window.

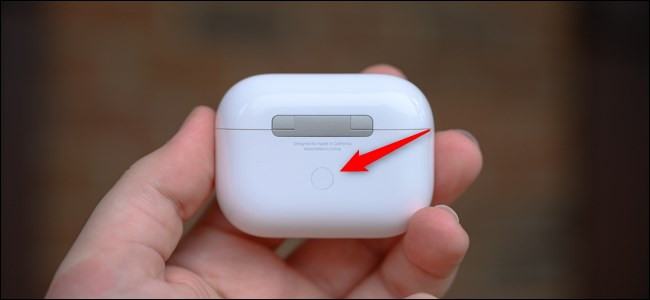
Windows will begin searching for Bluetooth devices. You’ll need to put your AirPods in Pairing Mode for Windows to find them. Put your AirPods in the case and open the lid, and then press and hold the Pairing button on the back of the case. When the light on the front of the case begins flashing white, you can let go of the button.
After a few seconds, Windows will find your AirPods. Select your AirPods from the list of found devices.

Once selected, Windows will begin pairing the two devices. Once finished, your AirPods will be connected to your Windows 11 PC.
No comments:
Post a Comment