If you’re having trouble with poor text or image quality on your printer, Windows 10 makes it easy to print a test page. We’ll show you how to do it.
Windows 10’s built-in test page feature works for all printers, so you can use it with your HP, Epson, Canon, and other printers. Before you begin, make sure that your printer’s paper tray is loaded with paper.
To get started, we’ll need to open Control Panel. To do so, click the “Start” button, search for “Control Panel,” and select its icon in the search results.

In “Control Panel,” in the top-right corner of the window, click “View By,” and then choose “Category” from the menu. This shows Control Panel options in a category mode. Next, in the same “Control Panel” window, locate the “Hardware and Sound” section and click “View Devices and Printers.”

In the “Devices and Printers” window that opens, scroll down to the “Printers” section. Here, right-click the printer that you want to test and select “Printer Properties” in the menu.

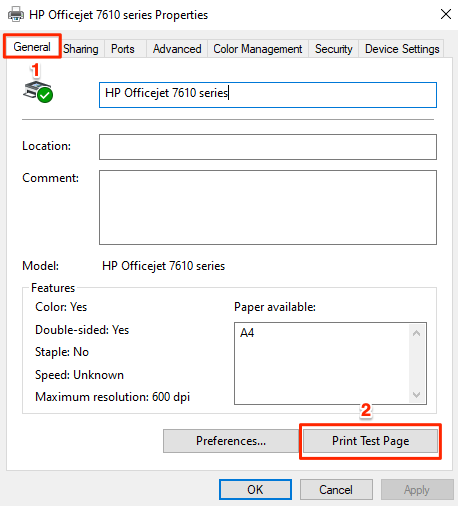
Windows 10 will open the printer’s Properties window. At the top of this window, click the “General” tab. Then, click “Print Test Page” at the bottom of the window to start printing a sample page.

Your printer will print a test page, and it will look something like this:

That’s all there is to it. Repeat as often as necessary, but be aware that each test page you print uses up some of your ink.

No comments:
Post a Comment