
Solution 1: Update your USB drivers
Before following this solution check if your printer is working on another computer or not. If it is working fine then the problem is likely to be the USB port drivers.
So here you need to update the driver to resolve error printing Windows 10.
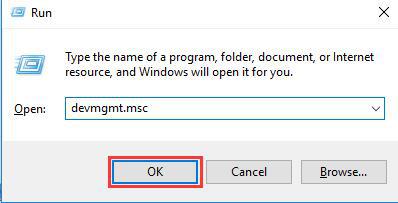
- Press Windows + R keys > in the Run dialog box > type devmgmt.msc > hit Enter.
- If prompted for an administrator password > then type the password > or click Allow
- Then in Device Manager > expand Universal Serial Bus Controllers
- And locate your USB port driver with its name chipset/controller. (Avoid the drivers with names like mass storage, generic USB, etc.)
- Now right-click on USB controller driver > click on the update driver software
- Then click on the next window that appears > select ‘Search automatically for updated drivers’
- Make sure you are connected to the internet to search for the latest drivers
- Wait for the whole process to complete > click OK
Now install your drivers and restart your computer, if the USB 3.0 port (blue) still shows the error, then try USB 2.0 port (black).
Moreover, you can also update the USB or printer driver easily by running the Driver Easy. This scan and update the drivers automatically compatible with your Windows 10 system.
Solution 2: Open the Printer Troubleshooter
If updating the driver won’t work for you to fix Windows 10 error printing message then here it is suggested to run the printer troubleshooter.
Follow the steps to do so:
- In the Windows search box > type “troubleshoot” > search for Troubleshoot settings
- Now, click Troubleshoot settings > to open the Settings window.
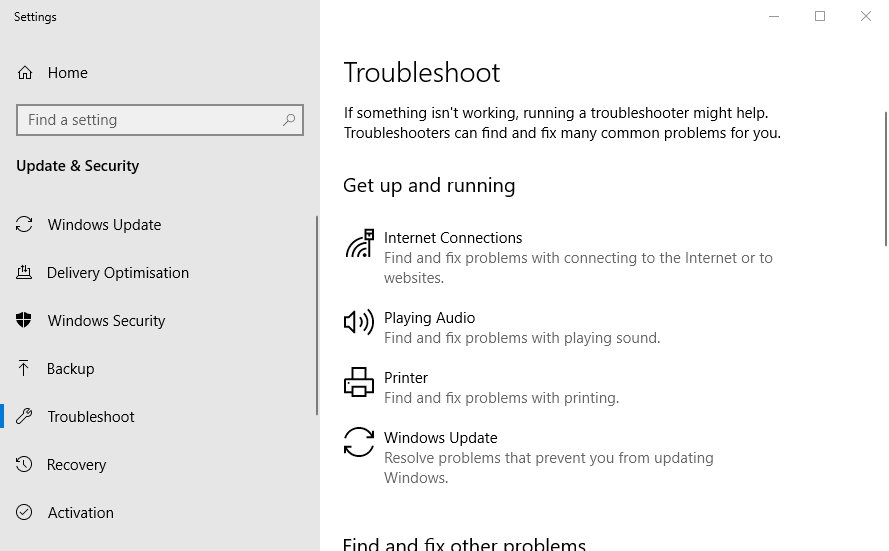
- Then click the Printer to hit Run the troubleshooter button.
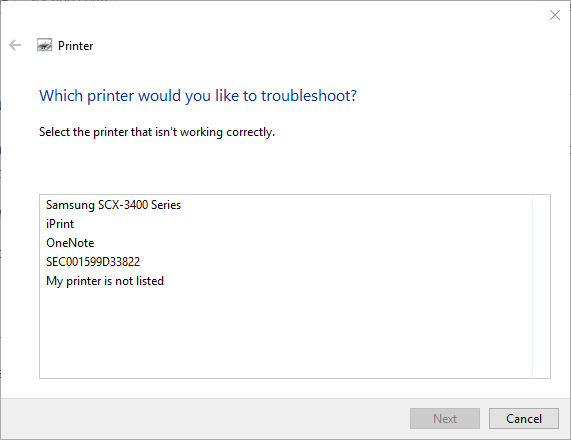
- And choose the Printer that needs fixing > click Next to start the troubleshooting steps.
And check if my printer says error and won’t print error is resolved. Or else head to the next solution.
Solution 3: Restart Printer Spool Service & Clear Printing Tasks
If none of the above solutions works for you then clear pending tasks after restarting the printer spool service and check if the issue is resolved.
Follow the below-given instructions:
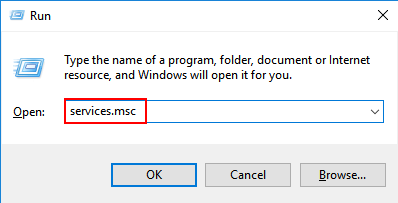
- Press Windows + R key > in the Run window > type services.msc
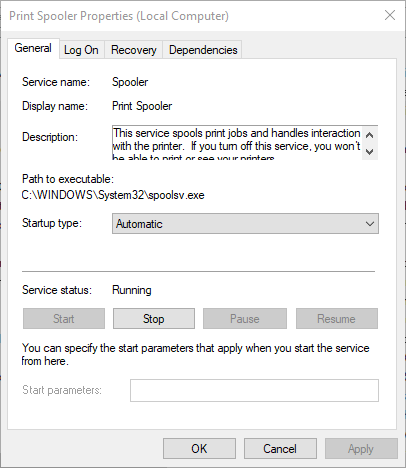
- Then in the Services window > scroll down the alphabetical list and search for the “Print Spooler” entry.

- Right-click the Print Spool entry > choose “stop”. Now the computer running process will stop that holds print queues.
- Leave that window open. And click “Start” > click “My Computer” to open the Windows Explorer window.
Now after stopping the queue service, you need to clear everything presented there. And to do so, go to the print spool folder hidden within the Windows folder. Commonly Windows is installed on local disk C: drive.
Usually, the path to the spool folder is C:\WINDOWS\system32\spool\PRINTERS, but it might be a bit different in your case.

You might get the warning message that you are about to view system files but click “View files anyway.”
- Now within this folder to empty jammed print queue delete every file by selecting everything and deleting.
- And after emptying the spool folder files > close explorer window > return to Services window.
- Lastly right-click the Print Spool entry > choose “Start” from the list to restart the Print spool service
- Close the services window > try printing again
It is estimated now the error printing message is fixed.
Solution 4: Check the Printer’s Port Settings
It might happen due to the printer’s port settings you are not able to print or getting an error message.
Follow the steps to do so:
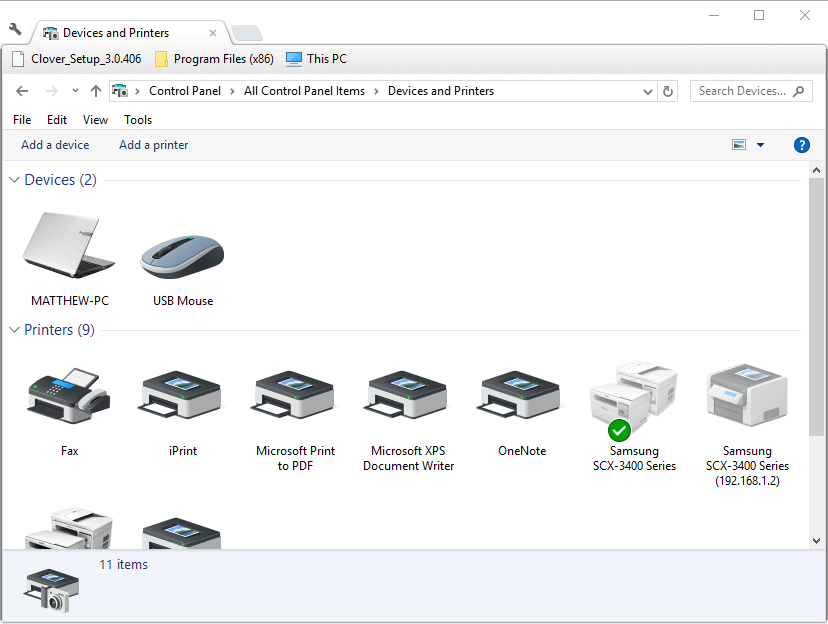
- Press Windows + R key > type Control Panel > click OK option.
- Then click Devices and Printers > right-click default printer > to select Printer properties.
- And choose the Ports tab and verify the port you generally plug the printer is selected there. But if not then deselect the currently selected port.
- And choose the port where the printer is usually connected
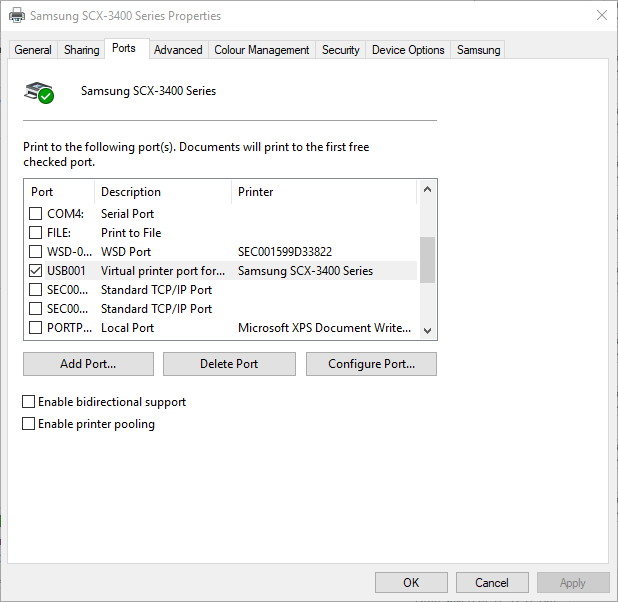
- Choose the Apply option > click OK to exit the window.
Alternate Quick Tweaks
#1: Turn off & Restart the printer
Hope the above-given solution works for you but if no then there is an alternate quick fix that you can try before or after following the given solutions:
Here it is suggested to switch off and restart the printer. A simple restart will works for you to flush the queue that can’t be shifted.
Just switch off your printer > unplug it > and plug it back and power on. And try printing. You can also restart your computer.
Hopefully, now the error printing message in Windows 10 is fixed,
#2: Check the Printer Paper Tray
Check if the paper tray in the printer might having difficulty in picking up the paper in the input tray. Also if you are having all in one printer then also you can use its other functions.
No comments:
Post a Comment