

Before we get too far into it, here are the exact folders we’re talking about:
- Contacts
- Desktop
- Documents
- Downloads
- Favorites
- Links
- Music
- Pictures
- Saved Games
- Searches
- Videos
There will be folders in your user directory that you can’t move this way. The AppData folder, for example, shouldn’t be moved. Some apps may also create folders there—especially cloud storage apps like OneDrive and Dropbox. You can’t move those using the instructions in this post. Instead, you’ll need to follow instructions for those given apps—we have a guide for moving the OneDrive folder and moving the Dropbox folder, for example.
Moving any of the personal folders on that list follows exactly the same procedure and works in every version of Windows from Vista on up—including Windows 7, 8, and 10. The first thing you’ll need to do is close any apps you have running, as open apps can interfere with the move.
Next, open a File Explorer window and navigate to the following folder (where username is the name of your user account):
C:\Users\username
Inside that folder, you should see all the personal folders we mentioned.

Right-click on the folder you want to move and then click “Properties.”

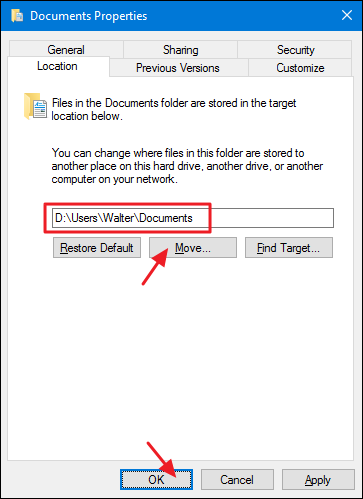
In the Properties window for the folder, switch to the “Location” tab. The text box shows the current location of the folder. You can select a new location either by typing the new path directly into the text box or by clicking the “Move” button and browsing for a new location to fill the text box that way. Either way, once the new location is shown, click “OK.”
The “Move Folder” confirmation window that pops up next is just badly worded enough that it can be confusing. Click “Yes” if you want to create the new location, have Windows start using it, and move all your files from the old location. Click “No” if you just want to create the folder and have Windows start using it, but don’t want to move your current files for some reason. Click “Cancel” to stop everything and not create the new folder location at all. We highly recommend choosing “Yes” so you don’t end up with files in two locations.

You should now see the folder in the new location. Windows and all your apps will now consider that the official location of that personal folder. Go ahead and repeat this process for the other folders you want to move. And, should you ever need to move it back, you can return to the “Location” tab of the folder’s properties window and either select a new location or just click the “Restore Default” button.
No comments:
Post a Comment